
Overview
This article describes the procedure for installing VyOS on a router appliance bare-bone PC and using it as a compact router.
Introduction
I had been using YAMAHA RTX series routers for various sites, and PPPoE and IPsec VPN between RTX units were reliable. However, looking at the firmware update frequency and support for modern cryptographic protocols, it was becoming increasingly difficult to justify.
For a router that supports IPv6, various VPNs (IPsec / OpenVPN / WireGuard), DNS proxy (zone-based forwarding), DHCP, advanced NAT, and keeps up with the latest cryptographic protocols, open-source solutions are the strongest option. Representative projects are listed below — all can be installed on x86/x64-based PC hardware (physical or virtual).
| Project | Pronunciation | Overview |
|---|---|---|
| OPNsense | “Open Sense” | FreeBSD-based GUI only Inherited from original m0n0wall Free |
| pfSense | “PF Sense” | FreeBSD-based GUI only Forked from m0n0wall Netgate product Free version available |
| OpenWrt | “Open W-R-T” | Linux-based CLI/GUI available Many derivative projects Free |
| VyOS | “Vie-OS” | Linux-based CLI only Evolved through acquisitions and forks from original Vyatta Rolling release: free / Support subscription: paid |
I use OPNsense and pfSense both physically and virtually at work, and they’re convenient as compact router boxes, but having configuration available only through the GUI is a real pain. Technical documentation and procedures are hard to write, and configuration backups are binary, which creates various challenges for keeping records.
VyOS is consistently CLI-only and can also export as a config file. Archiving it is as simple as printing the config or pasting it into a web management page. For business use, CLI is essential even if it has a steeper learning curve.
Having recently started using VyOS at work, I prepared a router appliance PC for home testing, installed VyOS, and put together this guide on how to turn it into a router.
Hardware
Selected the HUNSN RS34g from router appliance products available on Amazon. According to the HUNSN official website, it appears to be a Shenzhen, China manufacturer producing many embedded and industrial appliance products. Low power consumption, fanless design, solid build quality, and performance expectations are all excellent.
Specifications & Configuration
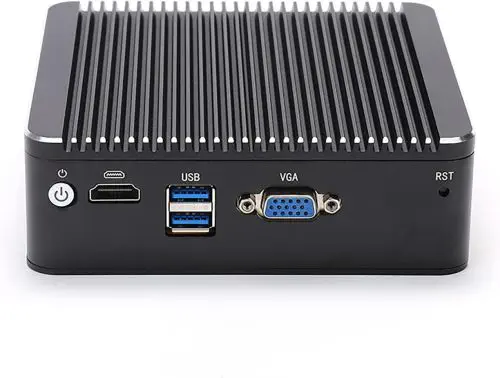
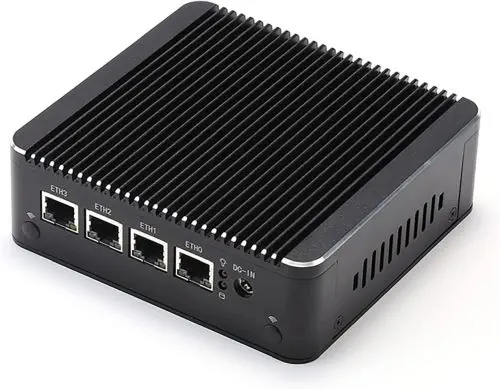
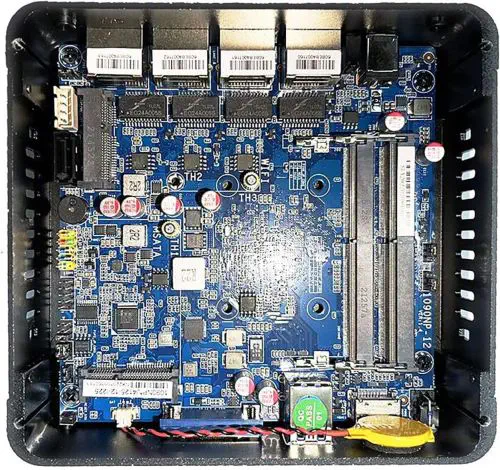
| Front | Rear | Interior |
|---|---|---|
|
|
|
| Item | Configuration |
|---|---|
| Manufacturer / Model | HUNSN RS34g |
| Chassis | Aluminum, fanless |
| CPU | Intel® Celeron® Processor J4125, 4M Cache, 2.70GHz |
| Storage | mSATA slot (additionally purchased: Transcend mSATA SSD 64GB TS64GMSA230S) |
| Memory | SODIMM DDR4-2400 slot ×2 (additionally purchased: CFD D4N2400PS-8G, PC4-19200 (DDR4-2400) 8GB ×1) |
| Expansion slot | Mini PCIe slot Wi-Fi module compatible |
| Interfaces | USB 3.0 ×2, HDMI, VGA, power button, reset hole |
| Network | Intel 2.5GbE I226-V b3 ×4 |
| Power | 12V/3A AC adapter included |
| Power consumption | Max 10W |
| Size / Weight | 126 × 134 × 40.6 mm / 1.2 kg |
Initial Setup
Download VyOS Rolling Release ISO on PC
- Download the latest ISO from VyOS nightly builds
Create Installation USB with Rufus
- Prepare a USB flash drive of 1 GB or larger
- Download Rufus to your PC
- Rufus can be run directly without installation
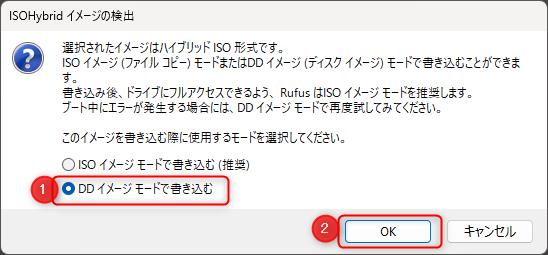
Use Rufus to write the downloaded VyOS ISO image to the USB drive.
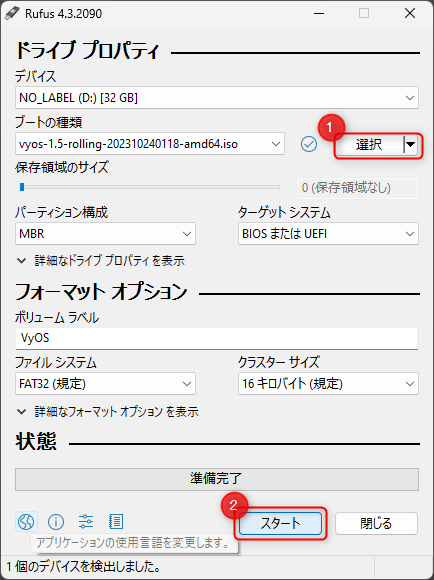
Select Write in DD Image mode — writing as an ISO image will fail to boot.
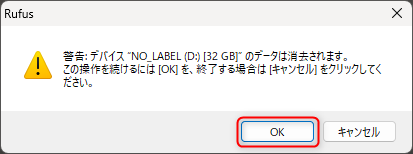
A warning about wiping all data will appear — click [OK].
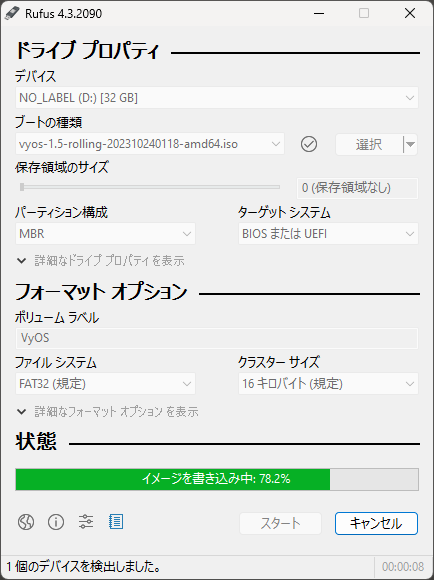
Wait for the write to complete.
RS34g Hardware Setup
- Install memory and SSD into the RS34g
- Connect keyboard, monitor (via HDMI), power, and USB drive to the RS34g, then power on
VyOS Setup
Follow VyOS: Installation and Image Management and perform the steps below.
Boot from USB; when the VyOS login prompt appears, log in with the default credentials.
login: vyos
password: vyos
Run the installation — replace version numbers as appropriate. Press [Enter] for everything except the “will destroy all data…” confirmation and the password change.
vyos@vyos:~$ install image
Welcome to the VyOS install program.  This script
will walk you through the process of installing the
VyOS image to a local hard drive.
Would you like to continue? (Yes/No) [Yes]: [Enter]

The VyOS image will require a minimum 2000MB root.
Would you like me to try to partition a drive automatically
or would you rather partition it manually with parted?  If
you have already setup your partitions, you may skip this step
Partition (Auto/Parted/Skip) [Auto]: [Enter]

I found the following drives on your system:
sda    10737MB
Install the image on? [sda]: [Enter]

This will destroy all data on /dev/sda.
Continue? (Yes/No) [No]: Yes[Enter]

Looking for pre-existing RAID groups...none found.
How big of a root partition shuld I create? (2000MB - 10737MB) [10737]MB:[Enter]

Creating filesystem on /dev/sda1: OK
Done!
Mounting /dev/sda1...
What would you like to name this image? [1.4-rolling-202302150317]: [Enter]
OK.  This image will be named: 1.4-rolling-202302150317
Copying squashfs image...
Copying kernel and initrd images...
Done!
I found the following configuration files:
    /opt/vyatta/etc/config/config.boot
    /opt/vyatta/etc/config.boot.default

Which one should I copy to sda? [/opt/vyatta/etc/config/config.boot]: [Enter]

Copying /opt/vyatta/etc/config/config.boot to sda.
Enter password for administrator account
Enter password for user 'vyos': XXXXXX[Enter]
Retype password for user 'vyos': XXXXXX[Enter]
I need to install the GRUB boot loader.
I found the following drives on your system:
sda    10737MB

Which drive should GRUB modify the boot partition on? [sda]:[Enter]

Setting up grub: OK
Done! Please reboot now.

$ reboot
Are you sure you want to reboot this system? [y/N] y[Enter]
Remove the USB drive during reboot.
VyOS Configuration
Log in to the OS.
login: vyos
password: <your password>
Enter configuration mode.
configure
Change keyboard layout (for Japanese keyboard).
set system option keyboard-layout jp106
commit
Network Address Assignment
Note: In the initial state, the physical port labeling on the RS34g and the OS interface names may not match — align them as needed.
Check initial state.
ip addr show
Note the MAC (ether) addresses assigned to eth0–eth3, sort them in ascending order, and assign them in order.
- If they already match, the
set interfacescommands will return errors — ignore them.
Example configuration:
configure

set interfaces ethernet eth0 hw-id '60:be:b4:09:ca:ab'
set interfaces ethernet eth1 hw-id '60:be:b4:09:ca:ac'
set interfaces ethernet eth2 hw-id '60:be:b4:09:ca:ad'
set interfaces ethernet eth3 hw-id '60:be:b4:09:ca:ae'
commit
save
exit
Reboot — answer y[Enter] when prompted.
reboot
Are you sure you want to reboot this system? [y/N]
This completes the setup as an “unconfigured router.”
VyOS Basics
VyOS normally operates in Operational Mode; switch to Configuration Mode when making changes.
# Enter Configuration Mode (prompt changes from $ to #)
configure
# Apply pending configuration changes
commit
# Save configuration to startup config
save
# Return to Operational Mode
exit
The configure / exit commands are omitted in the examples below — enter them as appropriate before and after making changes.
VyOS Configuration Examples
From this section onward, fill in the items required for your use case.
- Until IP addresses are configured, input can only be done from a locally connected keyboard and HDMI monitor.
IP Address Configuration Example
| Interface | Purpose | Protocol | Configuration |
|---|---|---|---|
| eth1 | External NW | IPv4 | DHCP client |
| eth1 | External NW | IPv6 | SLAAC + DHCPv6 client |
| eth0 | Internal NW | IPv4 | 192.168.100.1/24 static |
| eth0 | Internal NW | IPv6 | 240d:XX:XX:XX::17/64 static |
# eth1 IPv4
set interfaces ethernet eth1 description 'OUTSIDE'
set interfaces ethernet eth1 address dhcp
# eth1 IPv6
set interfaces ethernet eth1 ipv6 address autoconf
set interfaces ethernet eth1 address dhcpv6
# eth0 IPv4
set interfaces ethernet eth0 address '192.168.100.1/24'
set interfaces ethernet eth0 description 'INSIDE'
# eth0 IPv6
set interfaces ethernet eth1 address '240d:XX:XX:XX::17/64'
Once this is configured, all subsequent work can be done via SSH through the eth0 port.
Manual DNS Configuration Example (non-DHCP)
set system name-server '192.168.0.1'
set system name-server '240d:XXXX:XXXX:XXXX:XXXX:XXXX:XXXX:XXXX'
Advanced Configuration
Registering SSH Public Key for Management Terminal
Writing directly to ~/.ssh/authorized_keys will be lost on reboot — use this method instead.
Register the management PC’s SSH public key to the vyos user.
set system login user vyos authentication public-keys "ed25519-key-XXXXXXX" key "AAAAXXXXXXxxxxxXXXxxxXXXxxxxXXXXxxxxxx"
SNMP Configuration Example
set service snmp community public
set service snmp community public network 192.168.0.0/16
set service snmp community public network 127.0.0.1/8
set service snmp community public network ::1/128
Other Settings
# Remove login banner message
set system login banner post-login ""
# Remove serial console (if hardware has no serial device, errors will keep appearing without this)
delete system console
# Remove default NTP server references
delete service ntp server time1.vyos.net
delete service ntp server time2.vyos.net
delete service ntp server time3.vyos.net
# Restrict NTP to localhost only
delete service ntp allow-client address '0.0.0.0/0'
delete service ntp allow-client address '::/0'
set service ntp allow-client address '127.0.0.1'
set service ntp allow-client address '::1'
# Use NICT NTP server
set service ntp server ntp.nict.jp
# Set timezone
set system time-zone Asia/Tokyo
IPv4 Masquerade Example: eth0 → eth1
Reference: VyOS quick start
set nat source rule 100 description "VYOS-LAN to WAN: IP masquerade"
set nat source rule 100 outbound-interface eth1
set nat source rule 100 source address 192.168.100.0/24
set nat source rule 100 translation address masquerade
DHCP Server / DNS Forwarding for eth0 (Internal Network)
# DHCP server internal
# shared-network-name: VYOS-LAN
set service dhcp-server listen-address 192.168.100.1
set service dhcp-server shared-network-name VYOS-LAN subnet 192.168.100.0/24 default-router 192.168.100.1
set service dhcp-server shared-network-name VYOS-LAN subnet 192.168.100.0/24 name-server 192.168.100.1
set service dhcp-server shared-network-name VYOS-LAN subnet 192.168.100.0/24 domain-name localdomain
set service dhcp-server shared-network-name VYOS-LAN subnet 192.168.100.0/24 lease 14400
set service dhcp-server shared-network-name VYOS-LAN subnet 192.168.100.0/24 range 0 start 192.168.100.64
set service dhcp-server shared-network-name VYOS-LAN subnet 192.168.100.0/24 range 0 stop 192.168.100.127

# DNS forwarder
set service dns forwarding system
set service dns forwarding cache-size '0'
set service dns forwarding listen-address '192.168.100.1'
set service dns forwarding allow-from '192.168.100.0/24'
mDNS (Multicast DNS) Repeater
set service mdns repeater interface eth0
set service mdns repeater interface eth1
VyOS Update Procedure
Update to the latest Rolling Release version.
Pre-Update Check
Check Current VyOS Version
show version
Version:          VyOS 1.4-rolling-202302080317
Release train:    current

Built by:         [email protected]
Built on:         Wed 08 Feb 2023 03:17 UTC
Build UUID:       ce4d9361-2f83-44a1-88f4-488f1aa20f02
Build commit ID:  8cade9112a16ed

Architecture:     x86_64
Boot via:         installed image
System type:      VMware guest

Hardware vendor:  VMware, Inc.
Hardware model:   VMware Virtual Platform
Hardware S/N:     VMware-42 04 e6 47 10 ac 81 be-db c7 bc e8 e2 87 ba 2b
Hardware UUID:    47e60442-ac10-be81-dbc7-bce8e287ba2b

Copyright:        VyOS maintainers and contributors
Check Current VyOS Image Version
show system image
The system currently has the following image(s) installed:

   1: 1.4-rolling-202302080317 (default boot) (running image)
Check the VyOS nightly builds page to see if a newer version is available. Copy the URL of the latest ISO file and paste it into the command below. Press [Enter] for all prompts.
add system image https://github.com/vyos/vyos-rolling-nightly-builds/releases/download/1.X-rolling-YYYYMMDDnnnn/vyos-1.X-rolling-YYYYMMDDnnnn-amd64.iso
Trying to fetch ISO file from https://github.com/vyos/vyos-rolling-nightly-builds/releases/download/1.X-rolling-YYYYMMDDnnnn/vyos-1.X-rolling-YYYYMMDDnnnn-amd64.iso...
Downloading...
The file is 434.000 MiB.
[############################################################################################################] 100%
Download complete.
Done.
Checking for digital signature file...
Downloading...
(abbreviated)
Do you want to continue without signature check? (yes/no) [yes]
Checking SHA256 checksums of files on the ISO image... OK.
Done!
What would you like to name this image? [1.X-rolling-YYYYMMDDnnnn]:
OK.  This image will be named: 1.X-rolling-YYYYMMDDnnnn
Installing "1.X-rolling-YYYYMMDDnnnn" image.
Copying new release files...
Would you like to save the current configuration
directory and config file? (Yes/No) [Yes]:
Copying current configuration...
Would you like to save the SSH host keys from your
current configuration? (Yes/No) [Yes]:
Copying SSH keys...
Running post-install script...
Setting up grub configuration...
Done.
Verify that the downloaded image is ready.
show system image
The system currently has the following image(s) installed:

  1: 1.4-rolling-202302110748 (default boot)
  2: 1.4-rolling-202302080317 (running image)
Reboot.
$ reboot
Are you sure you want to reboot this system? [y/N] y
Reconnect via SSH after the reboot completes (about 1 minute).
Verify the VyOS version and image state after boot.
vyos@gd4rt01:~$ show version
Version:          VyOS 1.4-rolling-202302110748
Release train:    current

Built by:         [email protected]
Built on:         Sat 11 Feb 2023 07:48 UTC
Build UUID:       f3c3ece9-fd81-44a7-835e-ddf75a0c11f9
Build commit ID:  6d90ea4912b158

Architecture:     x86_64
Boot via:         installed image
System type:      VMware guest

Hardware vendor:  VMware, Inc.
Hardware model:   VMware Virtual Platform
Hardware S/N:     VMware-42 04 e6 47 10 ac 81 be-db c7 bc e8 e2 87 ba 2b
Hardware UUID:    47e60442-ac10-be81-dbc7-bce8e287ba2b

Copyright:        VyOS maintainers and contributors
Post-Update Check
If IPsec connections are defined, verify that they have recovered after the update.
show vpn ipsec sa
Remove Old Version
Once operation is confirmed, delete the old image. Specify the unused image name shown by show system image.
vyos@gd4rt01:~$ delete system image 1.4-rolling-202302080317
Are you sure you want to delete the
"1.4-rolling-202302080317" image? (Yes/No) [No]: Yes
Deleting the "1.4-rolling-202302080317" image...
Done
Confirm deletion is complete with the image list.
vyos@gd4rt01:~$ show system image
The system currently has the following image(s) installed:

   1: 1.4-rolling-202302110748 (default boot) (running image)
Maintenance
Clear VyOS DNS Proxy Cache
Run in Operational Mode.
reset dns forwarding all