Building a Compact Router with OpenWrt: HUNSN RS34g

Table of Contents
Overview #
This article describes the procedure for installing OpenWrt on a router appliance bare-bones PC and using it as a compact router.
This article is an OpenWrt remake of Building a Compact Router with VyOS: HUNSN RS34g.
Introduction #
Two years ago I built a DIY router using VyOS, but various operational issues came up.
- VyOS could not correctly receive IPv6 prefixes via DHCPv6-PD from Nuro Biz (business-grade ISP)
- VyOS does not implement IPv6 ND Proxy
- Using VyOS for free means using the Rolling release (essentially alpha/beta quality), with no other option
- The LTS version is paid subscription only — the minimum is a 5-year commitment at $1,600/year (about ¥240,000 at ¥150/USD), which is out of reach for an individual and expensive even for a business. Comparable to buying a commercial router every year.
Unable to get the features I needed, and with essentially no cost advantage despite cheap hardware, I switched to OpenWrt around 2024. I kept putting off writing about it, so I’m finally documenting it properly.
Features of OpenWrt (as of October 2025) #
- Originally started as a project to rewrite commercial router firmware on Linux
- Actively developed as open source from around 2004 to the present, supported by a broad community
- Free only — no paid edition exists
- Commercial routers based on OpenWrt also exist
- The Generic x86 version runs on standard PC hardware / virtual environments
- Highly customizable through a rich package ecosystem
- Designed with replacement of existing router firmware in mind — unfortunately there is no easy installer
- This article introduces a procedure to mitigate the installation hurdle
Hardware #
October 2025 note: On Japanese Amazon, all HUNSN (深圳-based Hansung Technology) products are listed as “out of stock” and are no longer available. Instead, products with identical designs from a brand called AIOPCWA are recommended. HUNSN appears to still exist as a company, but AIOPCWA returns no useful search results.
If choosing now, search Amazon for “AIOPCWA Firewall” and look for Intel N100/N150 models priced around ¥30,000–40,000.
The following is from April 2023: Selected the HUNSN RS34g from router appliance products sold on Amazon. According to HUNSN’s official website, they are a Shenzhen-based manufacturer producing many embedded and industrial appliance products. Low power consumption, fanless, solid build quality, and performance that easily meets expectations.
Hardware Specs and Configuration #
| Front | Rear | Internal |
|---|---|---|
 | 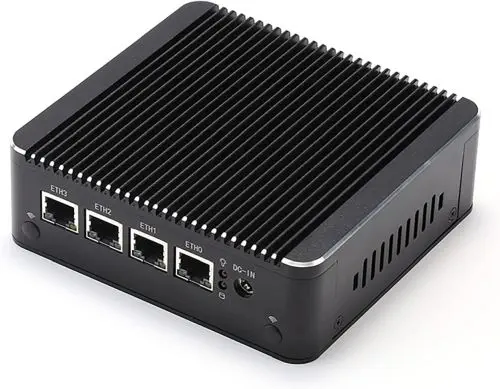 | 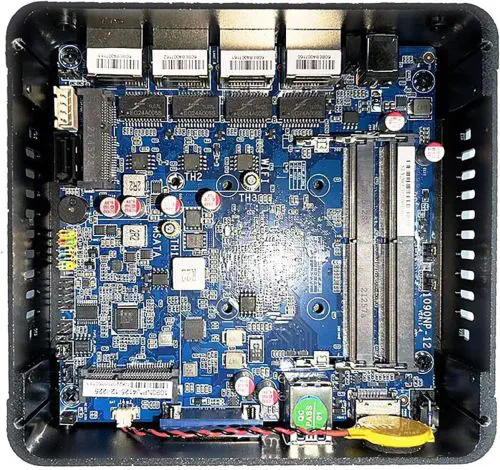 |
| Item | Configuration |
|---|---|
| Manufacturer/Model | HUNSN RS43g |
| Chassis | Aluminum, fanless |
| CPU | Intel® Celeron® Processor J4125, 4C4T, 4M cache, 2.70GHz |
| Storage | mSATA slot (added: Transcend mSATA SSD 64GB TS64GMSA230S) |
| Memory | SODIMM DDR4-2400 slot ×2 (added: CFD DDR4-2400 8GB×1 D4N2400PS-8G) |
| Expansion | mini PCIe slot Wi-Fi module capable |
| External I/O | USB3.0×2, HDMI, VGA, power button, reset hole |
| Wired LAN | 2.5GbE Intel I226-V b3 ×4 |
| Power | AC adapter 12V/3A |
| Power consumption | Max 10W |
| Size/Weight | 126 x 134 x 40.6mm / 1.2kg |
Setup Procedure #
(1) Pre-work on the Work PC #
Prepare a USB Live Linux for Installation #
Follow the article MX Linux: A Lightweight Maintenance Linux Distribution That Boots from USB to create a USB Live Linux.
Prepare the OpenWrt Image #
In a browser on the work PC, navigate to:
OpenWrt Stable Release > (latest version)/targets/x86/64/
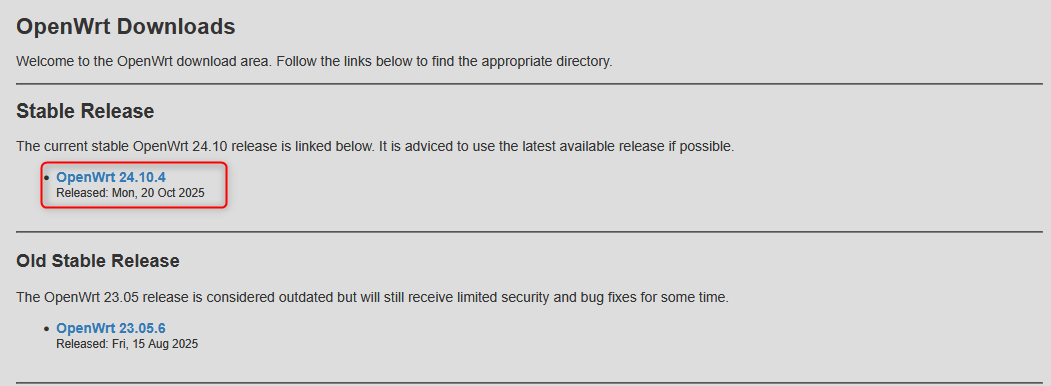
Download generic-ext4-combined-efi.img.gz.
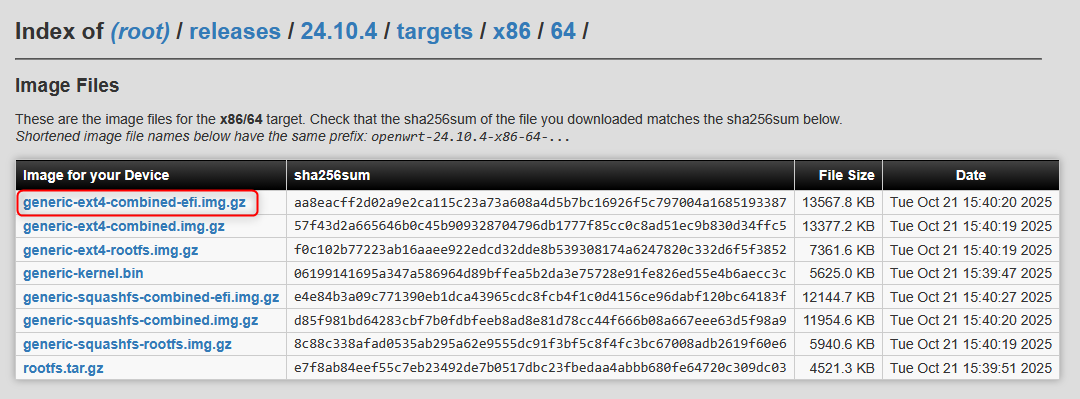
The actual filename will be something like openwrt-24.10.4-x86-64-generic-ext4-combined-efi.img.gz.
Following the File Exchange: Windows PC → MX Linux section of the article above, copy the downloaded image file to the top folder of the MX Linux USB drive.
(2) Basic Configuration on the Router PC #
Write to the Router PC #
- Insert the MX Linux USB into the router PC
- Boot the router PC and enter the BIOS menu
- Select the USB drive from the BIOS boot device selection and boot
- For HUNSN RS34g: BIOS menu [Save & Exit] tab > find the USB drive name under [Boot Override] and press [Enter], selecting the UEFI option
- Wait for MX Linux to boot
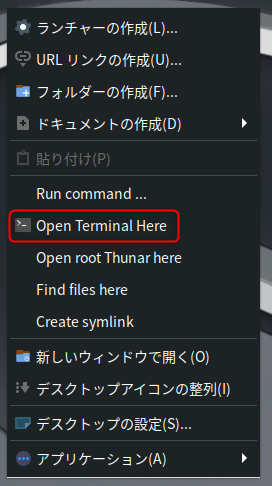
- Once logged in to MX Linux, right-click to open a terminal (Open Terminal Here)
$ sudo su -↵
[sudo] password for demo: (password)↵
# lsblk↵
NAME     MAJ:MIN RM  SIZE RO TYPE MOUNTPOINTS
loop0      7:0    0  2.3G  1 loop /live/linux
loop1      7:1    0    4G  0 loop /live/persist-root
sda        8:0    0 59.6G  0 disk
├─sda1     8:1    0   16M  0 part
├─sda2     8:2    0 59.6G  0 part
└─sda128 259:0    0  239K  0 part
sdb        8:16   1 28.9G  0 disk
└─sdb1     8:17   1 28.9G  0 part /home/demo/Live-usb-storage
                                  /root/Live-usb-storage
/live/boot-dev## (Move to the top folder of the MX Linux USB)
cd /live/boot-dev/
## (Confirm the image file is there)
ls *.img.gz
## (Write the image to the internal SSD)
zcat openwrt-24.10.4-x86-64-generic-ext4-combined-efi.img.gz > /dev/sda
## (Completes in a few seconds)
exit
Shut down MX Linux on the router PC and remove the MX Linux USB drive.
Boot OpenWrt on the Router PC #
Power on the router PC. If the OpenWrt image was written successfully, it should boot from the internal SSD.
- Confirm BIOS → Grub → OpenWrt boot sequence on the monitor
- When the display stops, press [Enter] to log in
BusyBox v1.36.1 (2025-10-19 16:37:45 UTC) built-in shell (ash)

  _______                     ________        __
 |       |.-----.-----.-----.|  |  |  |.----.|  |_
 |   -   ||  _  |  -__|     ||  |  |  ||   _||   _|
 |_______||   __|_____|__|__||________||__|  |____|
          |__| W I R E L E S S   F R E E D O M
 -----------------------------------------------------
 OpenWrt 24.10.4, r28959-29397011cc
 -----------------------------------------------------
=== WARNING! =====================================
There is no root password defined on this device!
Use the "passwd" command to set up a new password
in order to prevent unauthorized SSH logins.
--------------------------------------------------
- Set the OpenWrt root password
root@OpenWrt:~# passwd↵
Changing password for root
New password: (password)↵
Retype password: (password)↵
passwd: password for root changed by root- Use
ifconfigto confirm that “br-lan” has 192.168.1.1 (Mask 255.255.255.0) assigned.
root@OpenWrt:~# ifconfig↵
br-lan    Link encap:Ethernet  HWaddr 60:BE:B4:09:CA:AB
          inet addr:192.168.1.1  Bcast:192.168.1.255  Mask:255.255.255.0
          inet6 addr: fe80::62be:b4ff:fe09:caab/64 Scope:Link
          inet6 addr: fde1:7c9a:bbd7::1/60 Scope:Global
          UP BROADCAST RUNNING MULTICAST  MTU:1500  Metric:1
          RX packets:14199 errors:0 dropped:1294 overruns:0 frame:0
          TX packets:1313 errors:0 dropped:0 overruns:0 carrier:0
          collisions:0 txqueuelen:1000
          RX bytes:3520810 (3.3 MiB)  TX bytes:165257 (161.3 KiB)

eth0      Link encap:Ethernet  HWaddr 60:BE:B4:09:CA:AB
          UP BROADCAST RUNNING MULTICAST  MTU:1500  Metric:1
          RX packets:14433 errors:0 dropped:178 overruns:0 frame:0
          TX packets:1316 errors:0 dropped:0 overruns:0 carrier:0
          collisions:0 txqueuelen:1000
          RX bytes:3766844 (3.5 MiB)  TX bytes:165523 (161.6 KiB)
          Memory:a1600000-a16fffff

eth1      Link encap:Ethernet  HWaddr 60:BE:B4:09:CA:AC
          inet6 addr: fe80::62be:b4ff:fe09:caac/64 Scope:Link
          UP BROADCAST MULTICAST  MTU:1500  Metric:1
          RX packets:0 errors:0 dropped:0 overruns:0 frame:0
          TX packets:0 errors:0 dropped:0 overruns:0 carrier:0
          collisions:0 txqueuelen:1000
          RX bytes:0 (0 KiB)  TX bytes:0 (0 KiB)
          Memory:a1400000-a14fffff

lo        Link encap:Local Loopback
          inet addr:127.0.0.1  Mask:255.0.0.0
          inet6 addr: ::1/128 Scope:Host
          UP LOOPBACK RUNNING  MTU:65536  Metric:1
          RX packets:737 errors:0 dropped:0 overruns:0 frame:0
          TX packets:737 errors:0 dropped:0 overruns:0 carrier:0
          collisions:0 txqueuelen:1000
RX bytes:58665 (57.2 KiB) TX bytes:58665 (57.2 KiB)- For a 4-port PC like the HUNSN RS34g, the default state is:
| Physical Port | OpenWrt I/F | State |
|---|---|---|
| ETH0 | eth0 | Assigned to br-lan bridge |
| ETH1 | eth1 | WAN (DHCP client) |
| ETH2 | eth2 | (unassigned) |
| ETH3 | eth3 | (unassigned) |
| — | br-lan | LAN (DHCP server) |
- Connect your home/office LAN to ETH1 and confirm DHCP provides an address
- Use
ifconfigto verify an address is assigned to eth1 - If your existing LAN uses the 192.168.1.x segment, there may be a conflict and things may not work properly
- ※ Be absolutely careful: connecting ETH0 to your home/office LAN will cause a DHCP server conflict
- Use
Changing the OpenWrt LAN Address in Advance #
If the existing network you’re connecting to OpenWrt’s WAN side overlaps with 192.168.1.0/24, the subsequent steps will fail. To change OpenWrt’s LAN address beforehand, enter the following commands using the directly connected keyboard.
# Set the desired OpenWrt LAN IP (example)
uci set network.lan.ipaddr='192.0.2.1'
uci set network.lan.netmask='255.255.255.0'
uci commit
service network restart
(3) Remote Configuration via SSH from Work PC #
Connect the Work PC to the Router PC #
- Connect the work PC’s LAN port to the router PC’s LAN side (ETH0) with a LAN cable
- Using a second LAN port added via USB-LAN adapter is convenient
- Keep the router PC’s WAN side (ETH1) connected to your home/office LAN
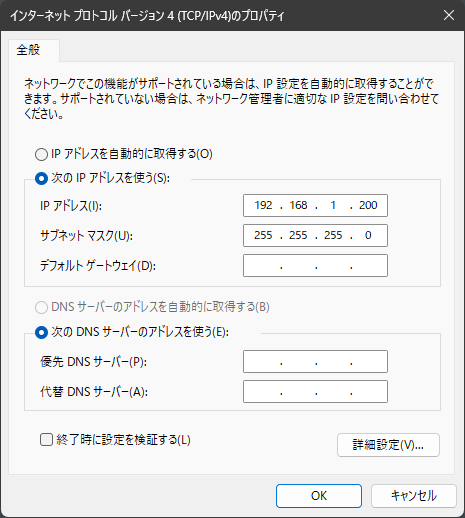
- Change the IPv4 address on the work PC’s port connected to the router PC
- IPv4 address: 192.168.1.200/255.255.255.0
- If you changed the LAN IP in the previous step, use 192.0.2.200/255.255.255.0 etc. and adjust accordingly
- Default gateway/DNS: leave blank
- IPv4 address: 192.168.1.200/255.255.255.0
- Try pinging 192.168.1.1 (or your modified OpenWrt LAN IP) from PowerShell to check for a response
PS C:\> ping 192.168.1.1

Pinging 192.168.1.1 with 32 bytes of data:
Reply from 192.168.1.1: bytes=32 time<1ms TTL=64
Reply from 192.168.1.1: bytes=32 time<1ms TTL=64
Reply from 192.168.1.1: bytes=32 time<1ms TTL=64
Reply from 192.168.1.1: bytes=32 time<1ms TTL=64

Ping statistics for 192.168.1.1:
    Packets: Sent = 4, Received = 4, Lost = 0 (0% loss),
Approximate round trip times in milli-seconds:
    Minimum = 0ms, Maximum = 0ms, Average = 0ms
SSH from Work PC to Router PC #
From here, use Windows’ built-in SSH client or an app like RLogin to SSH into the router PC and work remotely.
- SSH destination: 192.168.1.1
- User: root
- Password: (the one set earlier)
BusyBox v1.36.1 (2025-10-19 16:37:45 UTC) built-in shell (ash)

  _______                     ________        __
 |       |.-----.-----.-----.|  |  |  |.----.|  |_
 |   -   ||  _  |  -__|     ||  |  |  ||   _||   _|
 |_______||   __|_____|__|__||________||__|  |____|
          |__| W I R E L E S S   F R E E D O M
 -----------------------------------------------------
 OpenWrt 24.10.4, r28959-29397011cc
 -----------------------------------------------------
root@OpenWrt:~#
Verify OpenWrt Internet Connectivity #
OK if ETH1 obtains an IP via DHCP and can resolve OpenWrt’s domain name.
root@OpenWrt:~# nslookup www.openwrt.org
Server:         127.0.0.1
Address:        127.0.0.1:53

Non-authoritative answer:
www.openwrt.org canonical name = wiki-03.infra.openwrt.org
Name:   wiki-03.infra.openwrt.org
Address: 64.226.122.113

Non-authoritative answer:
www.openwrt.org canonical name = wiki-03.infra.openwrt.org
Name:   wiki-03.infra.openwrt.org
Address: 2a03:b0c0:3:d0::1a51:c001
※ OpenWrt runs dnsmasq as a DNS cache by default, so Server address is always 127.0.0.1 (localhost)
Partition Expansion #
- After booting from a written image, OpenWrt’s
/filesystem is only about 100MB by default - Expand the partition size to use the full SSD capacity
Check storage (before expansion)
root@OpenWrt:~# df -h
Filesystem                Size      Used Available Use% Mounted on
/dev/root                98.3M     25.5M     70.7M  27% /   # ← root has little free space
tmpfs                     3.8G    260.0K      3.8G   0% /tmp
/dev/sda1                16.0M      6.3M      9.7M  39% /boot
/dev/sda1                16.0M      6.3M      9.7M  39% /boot
tmpfs                   512.0K         0    512.0K   0% /dev
Install packages
opkg update
opkg install parted losetup resize2fs
Download and run the partition expansion script, then reboot
cd /tmp
wget -U "" -O expand-root.sh "https://openwrt.org/_export/code/docs/guide-user/advanced/expand_root?codeblock=0"
. ./expand-root.sh
reboot
SSH disconnects at reboot. The system reboots about 3 times. After completion, SSH back in and verify capacity.
root@OpenWrt:~# df -h
Filesystem                Size      Used Available Use% Mounted on
/dev/root                58.8G     27.1M     58.8G   0% /  # ← root has more free space
tmpfs                     3.8G    232.0K      3.8G   0% /tmp
/dev/sda1                16.0M      6.3M      9.7M  39% /boot
/dev/sda1                16.0M      6.3M      9.7M  39% /boot
tmpfs                   512.0K         0    512.0K   0% /dev
Additional Package Installation #
- Add missing packages from the default OpenWrt image
- Update all packages
# Fetch package list
opkg update
# CPU features
opkg install acpid irqbalance luci-app-irqbalance intel-microcode
# Intel Graphics driver
opkg install i915-firmware
# Maintenance tools
opkg install htop less diffutils vim-full procps-ng-ps procps-ng-w pciutils ethtool lsblk
# Monitoring
opkg install lm-sensors collectd-mod-sensors collectd-mod-thermal collectd-mod-irq lldpd luci-app-lldpd owut luci-app-attendedsysupgrade luci-app-statistics snmpd luci-app-snmpd fstrim openssh-sftp-server avahi-utils
# Wireguard VPN
opkg install wireguard-tools luci-proto-wireguard
# Japanese localization (remove if not needed)
opkg install luci-i18n-base-ja luci-i18n-attendedsysupgrade-ja luci-i18n-firewall-ja luci-i18n-package-manager-ja luci-i18n-statistics-ja luci-i18n-irqbalance-ja

# vim config
touch ~/.vimrc

# Upgrade all packages
opkg list-upgradable | cut -f 1 -d ' ' | xargs -r opkg upgrade

# Reboot
reboot
Network Configuration #
Applying the following policy:
- Physical port reassignment
| Physical Port | OpenWrt I/F | State |
|---|---|---|
| ETH0 | eth0 | Assigned to br-lan bridge |
| ETH1 | eth1 | Assigned to br-lan bridge ★ |
| ETH2 | eth2 | Assigned to br-lan bridge ★ |
| ETH3 | eth3 | WAN (DHCP client) ★ |
| — | br-lan | LAN (+DHCP server) |
- Change NTP server to NICT
- Other Ethernet tuning
Using UCI (Unified Configuration Interface), OpenWrt’s configuration command system. Web UI is also possible but would require extremely many steps, so this article uses CLI-based instructions.
# LAN
uci set network.lan.defaultroute='0'
uci set network.lan.delegate='0'
uci delete network.@device[0].ports
uci add_list network.@device[0].ports='eth0'
uci add_list network.@device[0].ports='eth1'
uci add_list network.@device[0].ports='eth2'
uci set network.lan.proto='static'
uci set network.lan.device='br-lan'
uci set network.lan.ip6assign='64'
# WAN
uci set network.wan.device='eth3'
uci set network.wan.delegate='0'
# WAN6
uci set network.wan6.device='eth3'
uci set network.wan6.proto='dhcpv6'
uci set network.wan6.reqaddress='try'
uci set network.wan6.reqprefix='auto'

# tuning
uci set firewall.@defaults[0].flow_offloading='1'
uci set firewall.@defaults[0].flow_offloading_hw='0'
uci set network.globals.packet_steering='1'
uci set irqbalance.irqbalance.enabled='1'

# Hostname, timezone, and other settings
uci set system.@system[0].hostname='homerouter0'
uci set system.@system[0].timezone='JST-9'
uci set system.@system[0].zonename='Asia/Tokyo'

# NTP server and distribution settings
uci set system.ntp=timeserver
uci set system.ntp.enable_server='1'
uci set system.ntp.use_dhcp='0'
uci set system.ntp.interface='lan'
uci delete system.ntp.server
uci add_list system.ntp.server='ntp.nict.jp'

uci commit

# Expand NAT tracking table for environments with many clients
# Default 4096 → 20000
# ※ Adjust based on CPU capacity
cat <<'__EOT__' >> /etc/sysctl.conf
net.netfilter.nf_conntrack_expect_max=20000
__EOT__

# Increase NIC ring buffer to prevent packet drops: 256 → 512
# ※ Adjust based on environment
cat <<'__EOT__' > /etc/rc.local
# Put your custom commands here that should be executed once
# the system init finished. By default this file does nothing.
ethtool -G eth0 rx 512 tx 512
ethtool -G eth1 rx 512 tx 512
ethtool -G eth2 rx 512 tx 512
ethtool -G eth3 rx 512 tx 512
exit 0
__EOT__

# Reboot when done
reboot
Recabling the Router PC #
In this example the WAN port has changed, so during the reboot swap the LAN cable from ETH1 → ETH3.
(4) OpenWrt Settings from Work PC Browser #
Open the URL below if using default values; adjust if the LAN address was changed.
http://192.168.1.1/
Enter the root password set earlier.

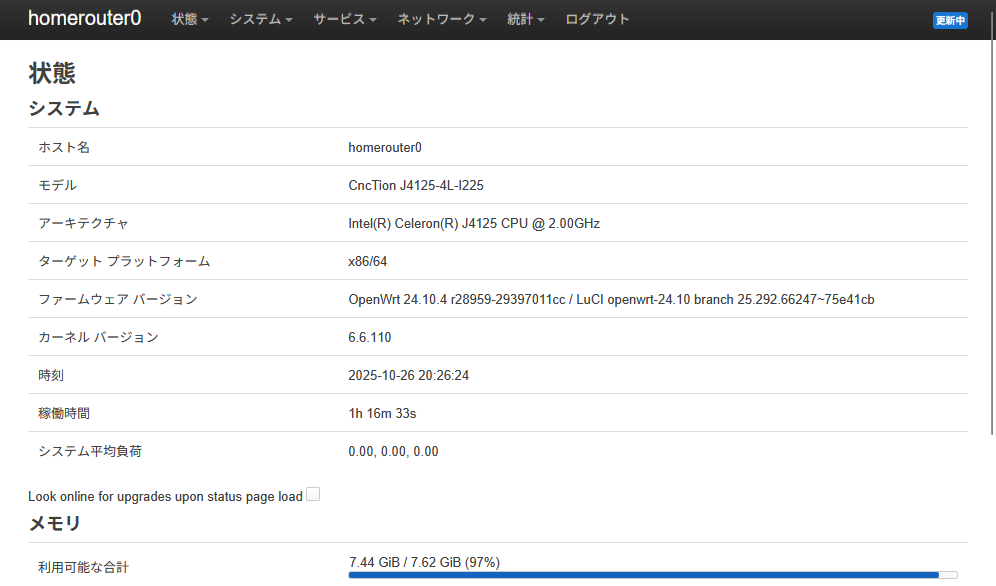
Confirm the overview screen appears.
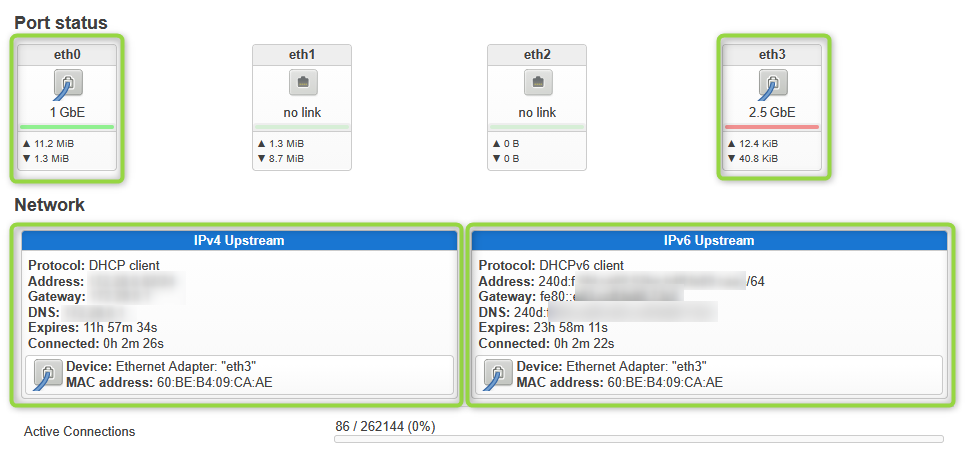
Scroll down to verify that physical ports eth0/eth3 are link-up and that the WAN side has obtained IPv4 DHCP / IPv6 SLAAC addresses from your home/office network. In the example screenshot, the home IPv6 Upstream is also automatically configured.
Follow-up Steps #
With this, the basic setup is complete. Customize for your environment by referring to the various documentation.
References #
- OpenWrt Project
- Official website
- OpenWrt Tutorial Video Playlist (YouTube)
- OpenWrt tutorial videos by “OneMarcFifty”. Recommended with subtitles + auto-translated to your language.
- How to configure OpenWrt as Firewall for your home network and Guest Wifi and IPTables explained
- Tutorial on configuring basic OpenWrt router firewall settings via Web UI (LuCI)
- IPv6 with OpenWrt (YouTube)
- Deep-dive on DHCPv6-PD used by business ISPs and IPv6 ND Proxy for home IPv6.
- Deep-dive on DHCPv6-PD used by business ISPs and IPv6 ND Proxy for home IPv6.