Integrating Obsidian with Claude via MCP

Table of Contents
Overview #
This guide covers how to connect Obsidian notes (Markdown) with Claude Desktop and Claude Code, enabling both to read from and write to your Vault directly.
Background #
Around April 2026, I migrated away from Evernote — a note-taking app I had used for over a decade — to Obsidian. The trigger was the repeated, steep price increases following Bending Spoons’ acquisition of Evernote in 2023, culminating in the discontinuation of the Personal and Professional plans and their replacement with a new Advanced plan at $249.99/year (2026). With Claude’s help I migrated close to 1,000 notes and wrapped everything up before that price hike landed.
Moving to Obsidian meant my notes were now stored as plain Markdown files. Markdown is the same format I use for blog posts, AI prompts, and GitHub documentation — a familiar, portable standard.
At the same time, I started using both [A] Claude Desktop (the app) and [B] Claude Code (the terminal tool), which cannot directly share chat history. Sharing work between them meant exporting a Markdown file from [A] and feeding it to [B] — an extra step every time.
With the setup in this article, Obsidian Vault (Markdown) becomes a central knowledge base that both Claude Desktop and Claude Code can read from and write to directly. In other words, the scattered .md files on your desktop and in random folders finally have a clean home.
Architecture #
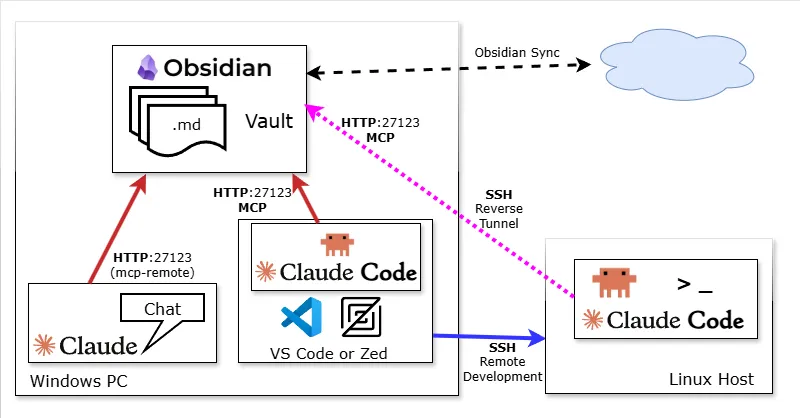
This article assumes the following setup:
| Service | Usage | Plan |
|---|---|---|
| Obsidian | Multiple Windows PCs + smartphone | Obsidian Sync (cross-device sync) |
| Claude Desktop (app) | Primarily on PC. General research and queries. Occasionally accessed from phone | Claude Pro |
| Claude Code | Terminal use on Windows PC and Linux servers. Code and file implementation | Claude Pro |
Setting Up the Obsidian Plugin #
The Local REST API with MCP plugin provides HTTP access to the Vault, enabling Claude to read and write notes via MCP.
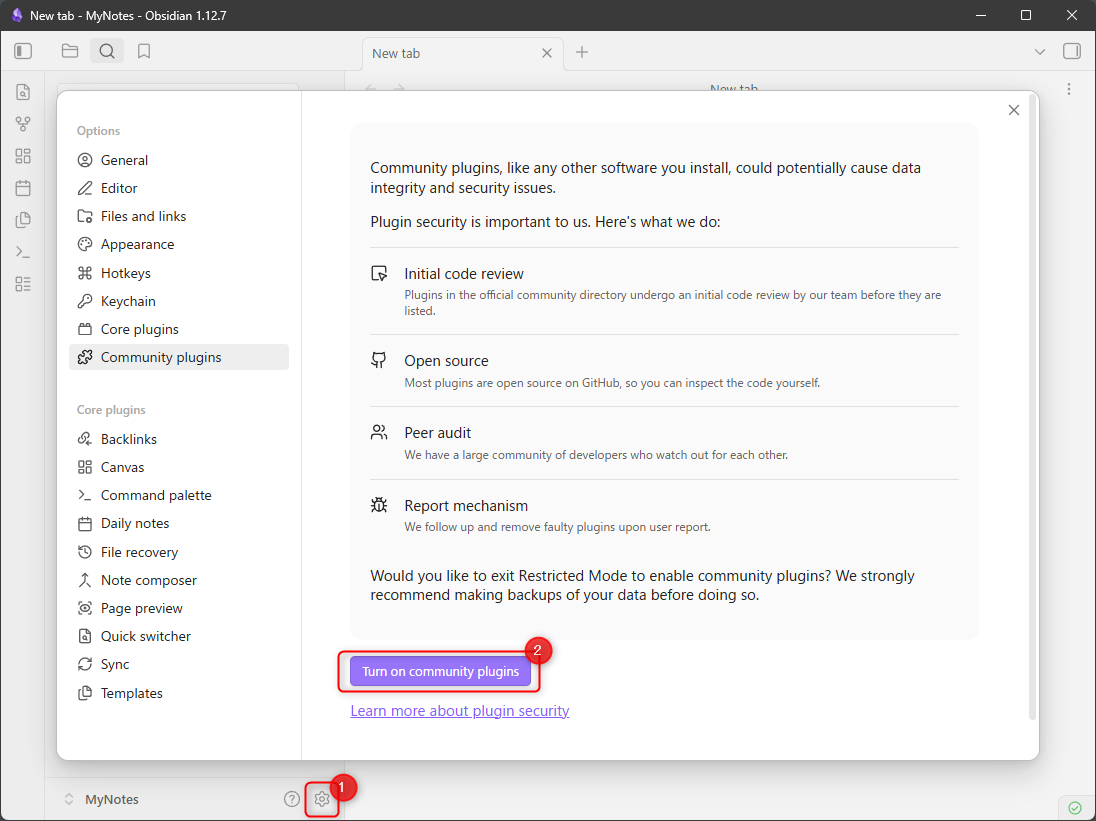
Installing the Plugin #
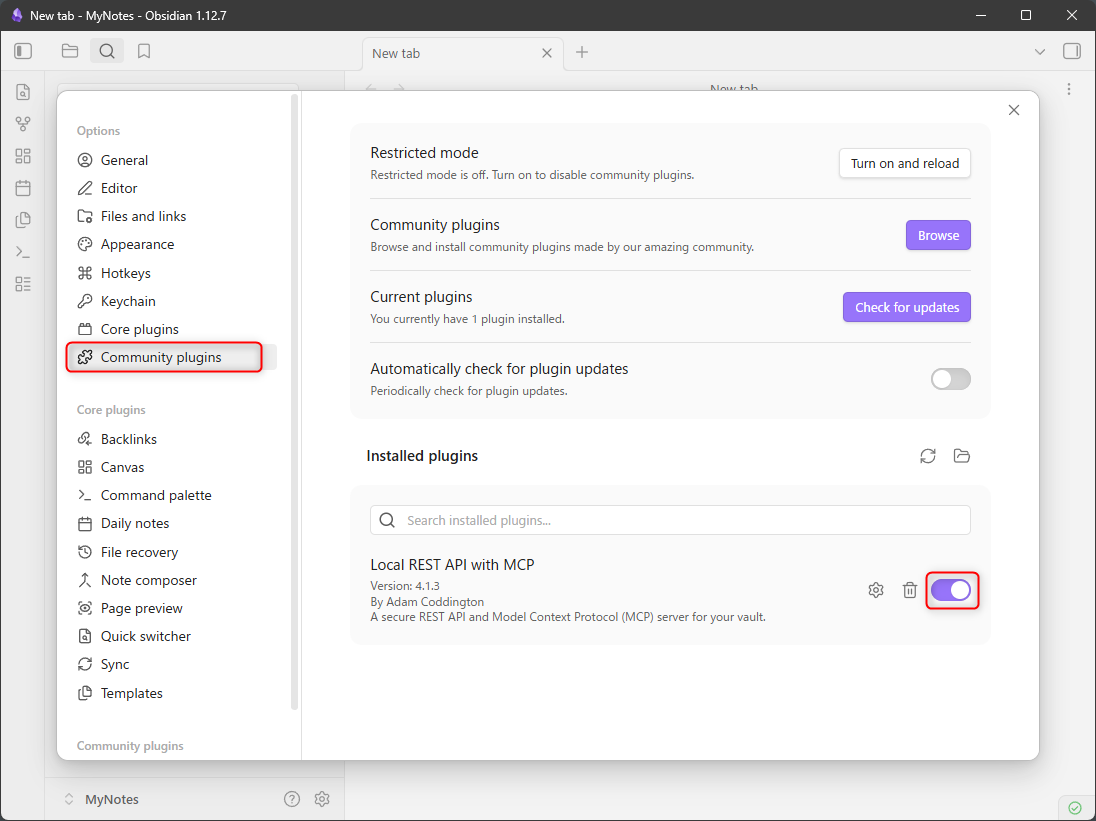
- ⚙ Settings → Community plugins → [Turn on community plugins]
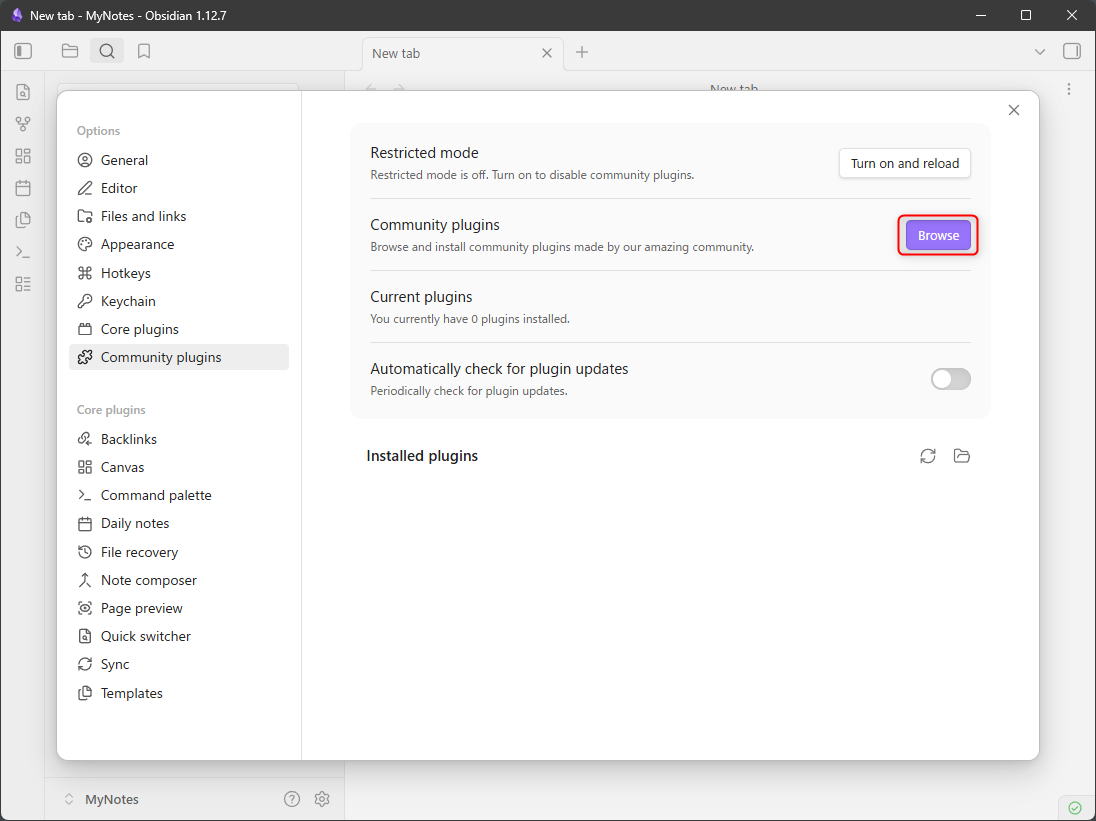
- Click [Browse] to open the plugin search
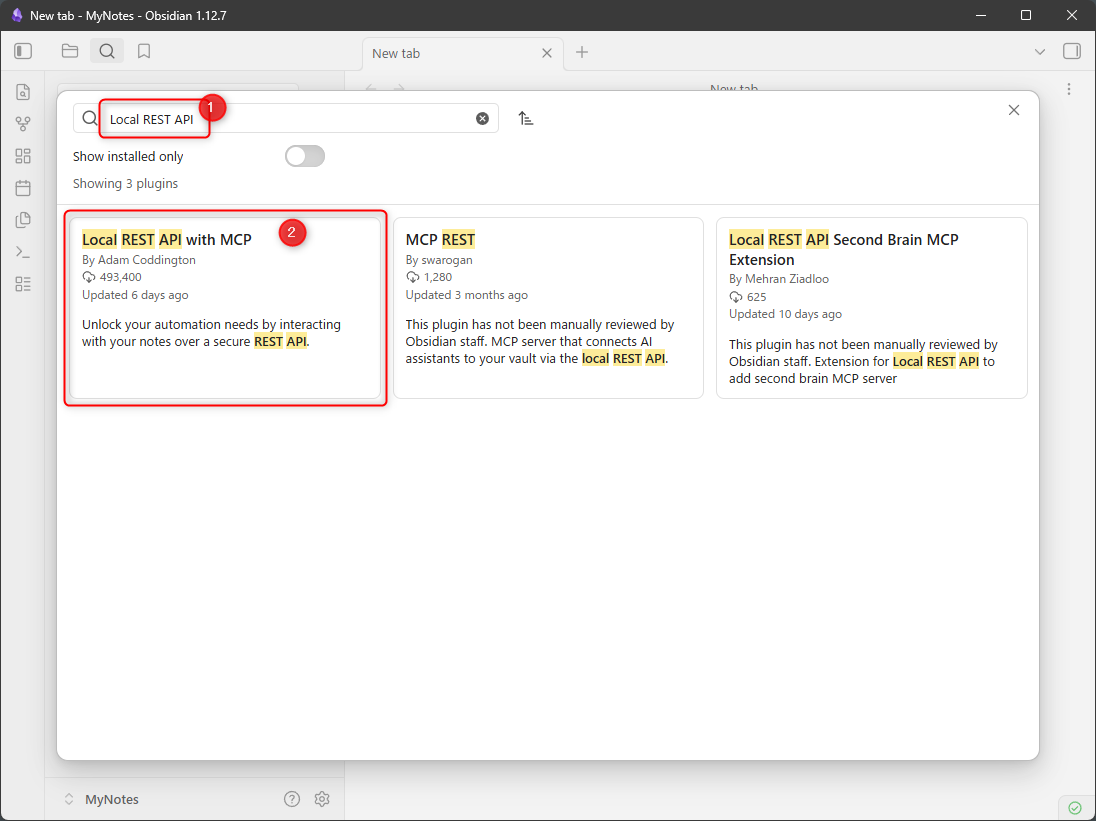
- Search for Local REST API and select Local REST API with MCP
- Click [Install]
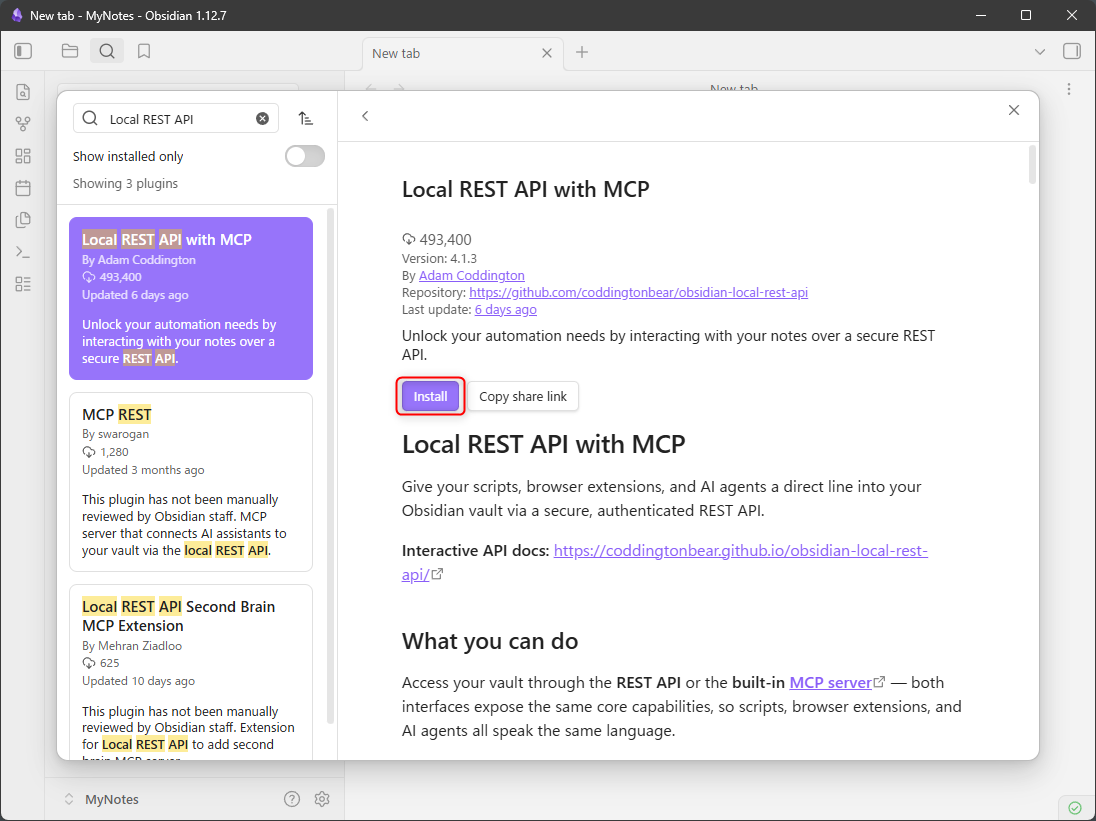
- Enable the plugin
Configuring the Plugin #
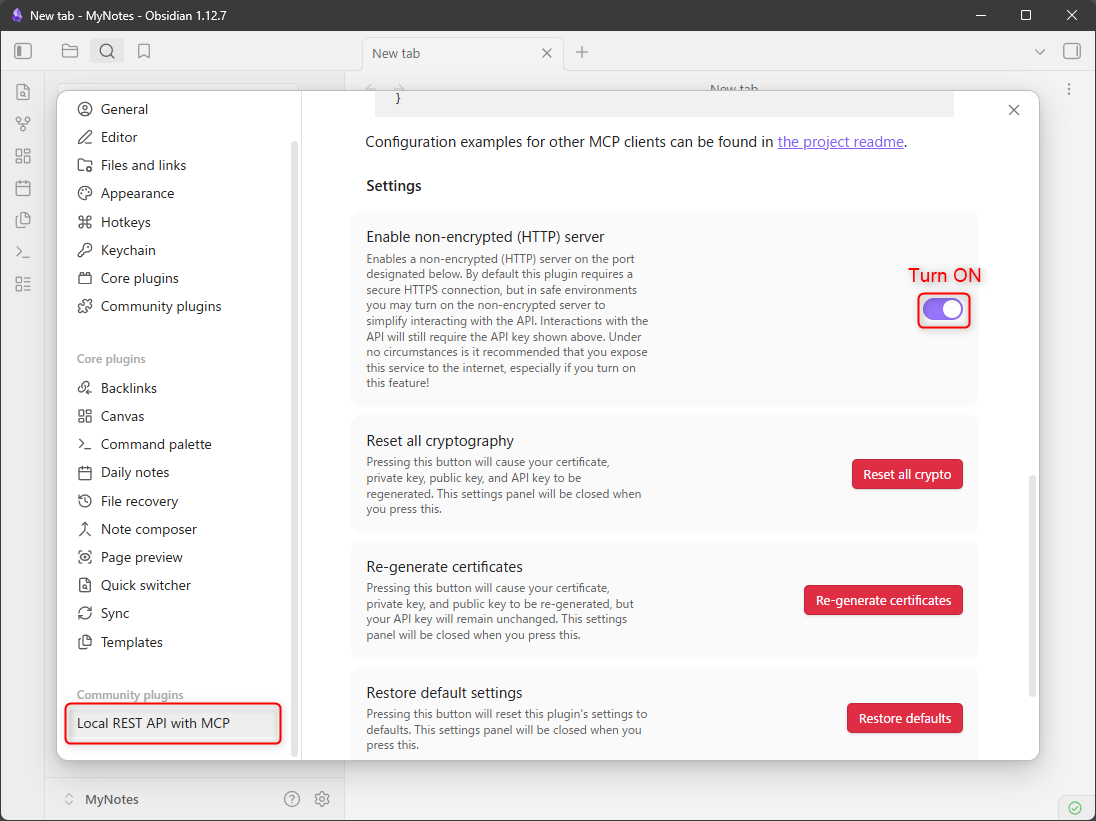
- Go to ⚙ Settings → Local REST API and turn on Enable non-encrypted (HTTP) server
- Copy the API key shown as “Bearer XXXXXXX” — you will need it in the next steps
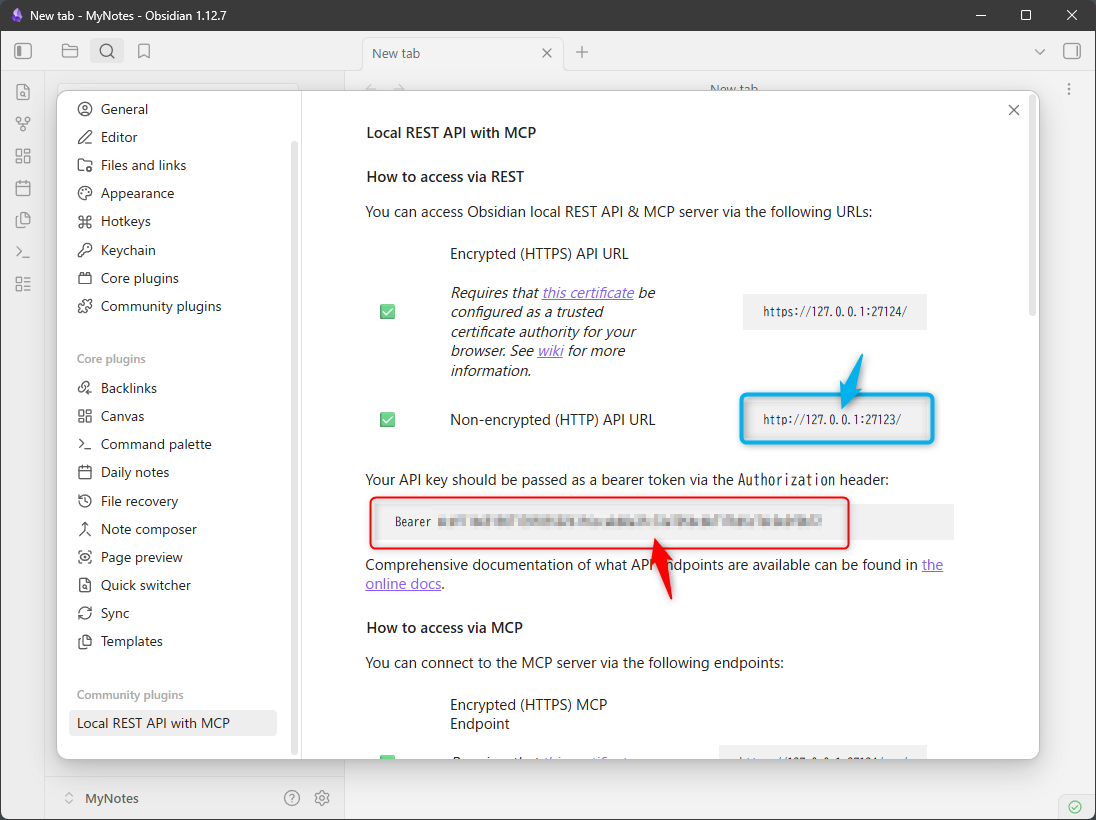
- HTTPS uses port 27124, but the self-signed certificate causes connection errors from Claude. This guide uses HTTP (port 27123).
Connecting Claude Code #
Claude Code natively supports HTTP MCP, so connecting is a single command:
claude mcp add --transport http obsidian http://127.0.0.1:27123/mcp/ --header "Authorization: Bearer <your-api-key>"
Verify the connection — obsidian should show “✓ Connected”:
$ claude mcp list↵
claude.ai Google Drive: https://drivemcp.googleapis.com/mcp/v1 - ! Needs authentication
obsidian: http://127.0.0.1:27123/mcp/ (HTTP) - ✓ Connected
If you need to reconfigure (e.g., wrong API key), remove the server and re-add it:
$ claude mcp remove obsidian↵
Removed MCP server "obsidian" from local config
Connecting Claude Desktop #
Claude Desktop Requires a Bridge #
As of June 2026, Claude Desktop does not natively support HTTP MCP. Instead, use mcp-remote — a bridge that converts the HTTP endpoint into the stdio format Claude Desktop expects. mcp-remote is executed via npx (Node Package eXecute), so Node.js must be installed separately.
Claude Desktop ──stdio──> mcp-remote (npx) ──HTTP──> Obsidian :27123
Installing Node.js (Watch the Path) #
Claude Desktop launches MCP servers using cmd.exe /C. If the install path contains spaces, the launch command gets truncated and fails, so install Node.js to a path with no spaces.
I reinstall Node.js to C:\opt\nodejs to avoid this problem.
| Install Path | Result | |
|---|---|---|
| ❌ | C:\Program Files\nodejs | Error: 'C:\Program' is not recognized |
| ✅ | C:\opt\nodejs | Starts successfully |
Editing the Config File #
You may see references to %APPDATA%\Claude\claude_desktop_config.json, but as of June 2026 the actual path in the Windows version is different. Always open it through the Settings screen:
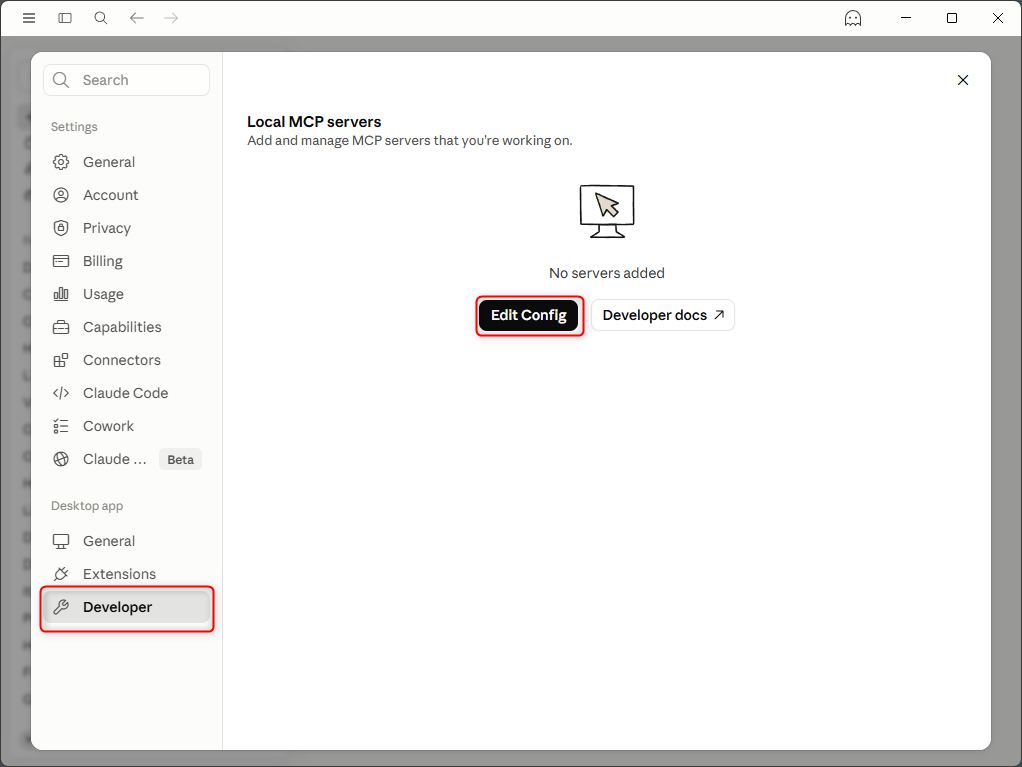
- [≡] → File → Settings…
- Sidebar: Developer
- Click [Edit Config]
On the test machine, the file manager opened to a path like:
C:\Users\user\AppData\Local\Packages\Claude_pzs8sxrjxfjjc\LocalCache\Roaming\Claude\claude_desktop_config.json
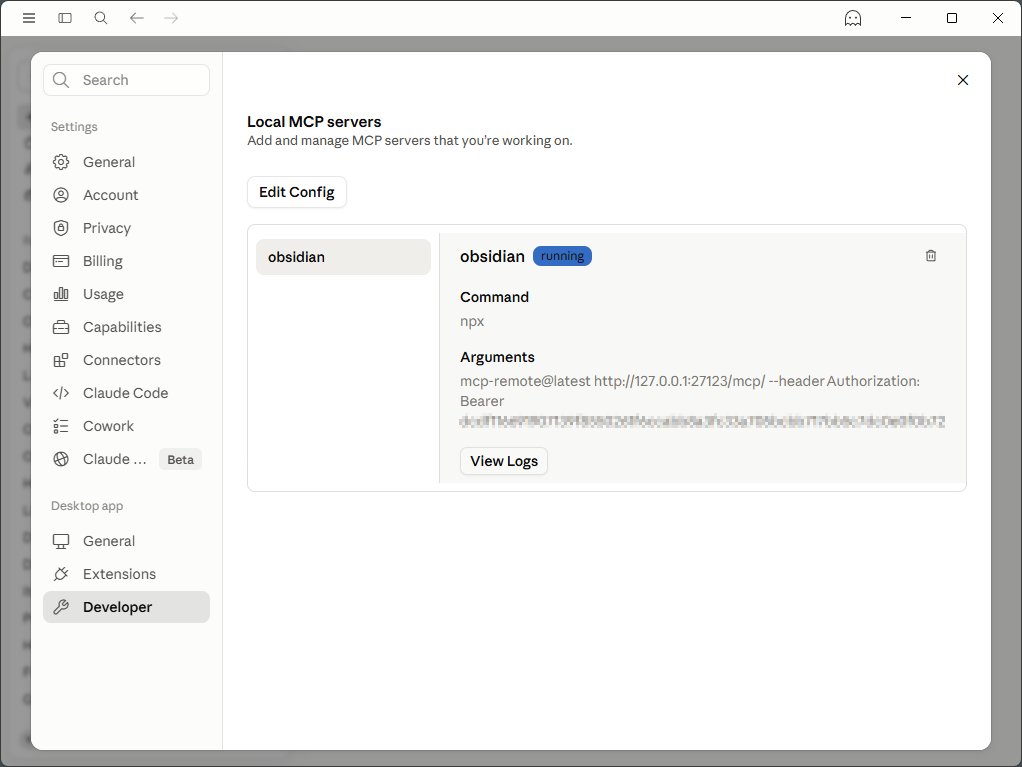
Open it in a JSON-friendly editor (e.g. VS Code) and add the “mcpServers” section following valid JSON syntax:
{
  "mcpServers": {
    "obsidian": {
      "command": "npx",
      "args": [
        "mcp-remote@latest",
        "http://127.0.0.1:27123/mcp/",
        "--header",
        "Authorization: Bearer <your-api-key>"
      ]
    }
  }
}
Replace <your-api-key> with the API key you copied from Obsidian.
Fully quit and restart Claude Desktop for the settings to take effect.
Connecting from a Remote Linux Host (SSH Reverse Port Forwarding) #
If you run Claude Code on a Linux host accessed via VS Code Remote SSH, here is how to connect it to the local Obsidian MCP.
Prerequisites #
- PC[A] (Windows): Obsidian + Local REST API plugin running
- Linux[B]: Claude Code execution environment
- VS Code Remote SSH connected from PC[A] to Linux[B]
How It Works #
SSH reverse port forwarding tunnels requests to localhost:27123 on Linux[B] back to Obsidian on PC[A].
PC[A] Obsidian :27123 <──SSH tunnel── Linux[B] :27123 <── Claude Code
SSH Config #
Add RemoteForward to %USERPROFILE%\.ssh\config on PC[A]. Use 127.0.0.1 explicitly, not localhost — on some systems localhost resolves to IPv6 ::1, which does not match Obsidian’s bind address (127.0.0.1) and causes connection failures.
Host <your-host>
  HostName <Linux[B] hostname or IP>
  IdentityFile ~/.ssh/id_ed25519
  User <username>
  RemoteForward 127.0.0.1:27123 127.0.0.1:27123
Connecting to the host in VS Code automatically establishes the tunnel.
Registering MCP on Linux[B] #
claude mcp add --transport http obsidian http://127.0.0.1:27123/mcp/ \
  --header "Authorization: Bearer <your-api-key>"
Optional connectivity check:
curl http://127.0.0.1:27123/vault/ \
  -H "Authorization: Bearer <your-api-key>"
# 200 OK with a file listing means success
Going Further #
Obsidian — Create a Shared Folder #
I created a dedicated folder called ClaudeSessions for Claude sessions. Claude Desktop and Claude Code read and write exclusively within this folder.
[Vault]
  |-- ClaudeSessions  ← create this
  |-- MyNotes  ← existing folder
Obsidian — Session Saving Template #
To keep saved notes consistent, create a template at ClaudeSessions/_template.md. Claude will reference it when creating new notes to generate frontmatter automatically.
Below is a sample for procedure notes and work logs. Customize it for your own use case.
---
title: {{title}}
session_started: {{YYYY-MM-DD}}
saved_at: {{YYYY-MM-DDThh:mm:ss+09:00}}
tags:
  - claude-session
  - {{tag}}
---

# {{title}}

## Summary

{{summary}}

---

## Steps / Content

{{body}}

---

## Troubleshooting

| Symptom | Cause | Fix |
|------|------|------|
| | | |

## Open Items / Next Steps

{{list any remaining tasks}}

## Handoff Notes (optional)

{{notes to carry forward; delete this section if not needed}}
When you tell Claude “Save this session to Obsidian,” it follows this workflow:
- Presents the target path, frontmatter, and body for your review
- Executes
vault_writeonce you approve - Reports completion
Claude Code — /note Custom Command #
If you want Obsidian integration across multiple projects, add the premise to ~/.claude/CLAUDE.md (user scope) so you do not have to re-explain MCP in every project:
## Obsidian Integration

Obsidian MCP is available. Use `mcp__obsidian__vault_read` when asked to read a note from Obsidian.

- Notes are stored under `ClaudeSessions/`
- Template: `ClaudeSessions/_template.md`
- When creating a new note, use `mcp__obsidian__vault_write` and follow the template's
  frontmatter format (title / session_started / saved_at / tags)
- Name files in `YYYY-MM-DD-title.md` format (e.g. 2026-06-10-session-notes.md)
- Use the `/note <filename>` command to quickly load a note from ClaudeSessions/
Then create ~/.claude/commands/note.md to define the /note <filename> custom command:
mkdir -p ~/.claude/commands
Contents of ~/.claude/commands/note.md:
Load the specified note from the ClaudeSessions/ folder in Obsidian and use it as context.

Steps:
1. Read `ClaudeSessions/$ARGUMENTS.md` using `mcp__obsidian__vault_read`
2. Summarize the content and present it to the user
3. Announce "I'll use this note as context" and apply it to subsequent work
Example prompt to Claude Code:
/note HOWTO-USE-OBSIDIAN — please summarize in 3 lines.
Claude Desktop — Custom Instructions #
Claude Desktop supports a standing set of instructions equivalent to Claude Code’s ~/.claude/CLAUDE.md:
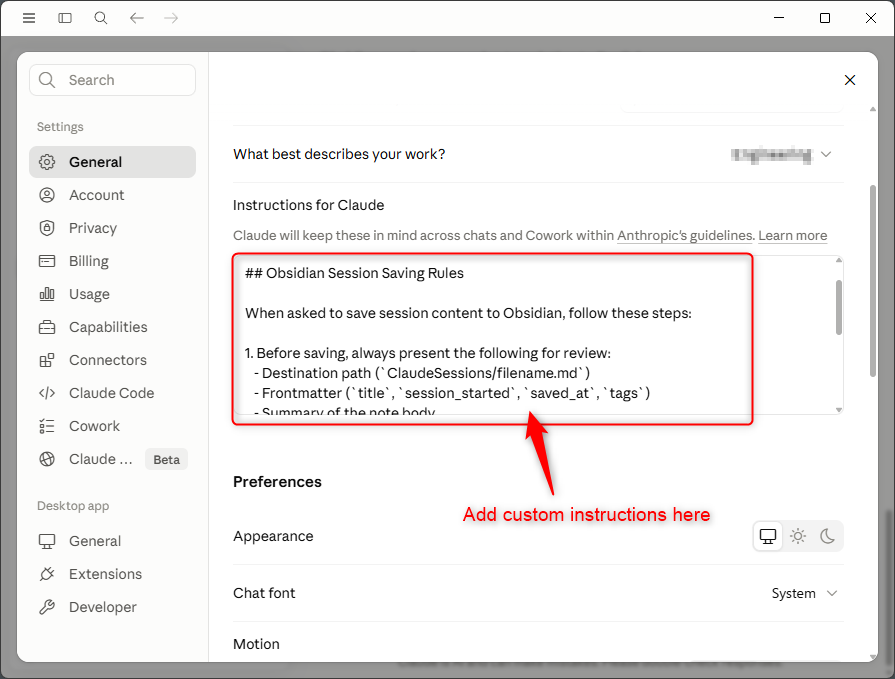
- [≡] → File → Settings…
- Sidebar → General
- In the Profile section, find the “Instructions for Claude” field and type your instructions (auto-saved)
## Saving Sessions to Obsidian

When I ask you to save this session to Obsidian, follow this workflow:

1. Draft first, then ask for approval. Before calling vault_write, present:
   - Target path (ClaudeSessions/filename.md)
   - Frontmatter (title, session_started, saved_at, tags)
   - A brief summary of what you plan to write
2. Wait for my "OK" before executing vault_write.
3. After saving, confirm completion and include the saved_at timestamp in your reply.
4. For patch/update operations, show the proposed changes before applying them.

Folder: ClaudeSessions/
Template: ClaudeSessions/_template.md
Required frontmatter: title, session_started, saved_at, tags
Always include the tag "claude-session"
Use Japan Standard Time (UTC+9) for saved_at
Name files in YYYY-MM-DD-title.md format (e.g. 2026-06-10-session-notes.md)
Troubleshooting #
| Environment | Symptom | Cause | Fix |
|---|---|---|---|
| SSH tunnel (Linux[B]) | Port 27123 not listening | VS Code Remote SSH not connected or tunnel not established | Reconnect to the host via VS Code Remote SSH |
| Claude Desktop (Windows) | Log shows 'C:\Program' is not recognized | Node.js install path contains a space | Reinstall Node.js to a path without spaces |